QuickBooks is a well-designed software known for offering comprehensive solutions for accounting tasks. Millions of small business owners use this software to streamline their accounting activities. QuickBooks can handle a high volume of tasks. For small and medium scale businesses this software is a boon. Moreover, the software is absolutely easy to work with.
One such stand out feature of QuickBooks is the export of charts of accounts. Accounts chart is the mainstay of the accounting system. It assists you to fine-tune your business finances. The QuickBooks offers you an easy-to-navigate Chart of accounts to keep your accounts books organized. Over it, to ensure you save time from recreating the same data by facilitating the export of charts of accounts from one file format to another, that too as and when required.
Chart of Accounts Template
QuickBooks is definitely one of the ideal choices for managing business accounting activities. This software is loaded with extensive features. It allows you to create your own template for charts of accounts as per your business structure type. You can create your customized templates and upload them into the software. The QuickBooks stub template allows you to create your preferred chart of accounts list as per your business scenario.
Now let us explore a step-by-step guide on how to export charts of accounts in QuickBooks.
Export your Chart of Accounts either using the QuickBooks desktop version or the QuickBooks Online version.
Method to Export Charts of Accounts from QuickBooks’ Desktop Version:
Step 1: Open QuickBooks company file.
Step 2: From the files of company, choose the option Chart of Accounts that you want to export.
Step 3: Next, select the “File” option from the top taskbar.
Step 4: After this, go to “Utilities” and select the “Export” option.
Step 5: Click on “IIF Files Lists”.
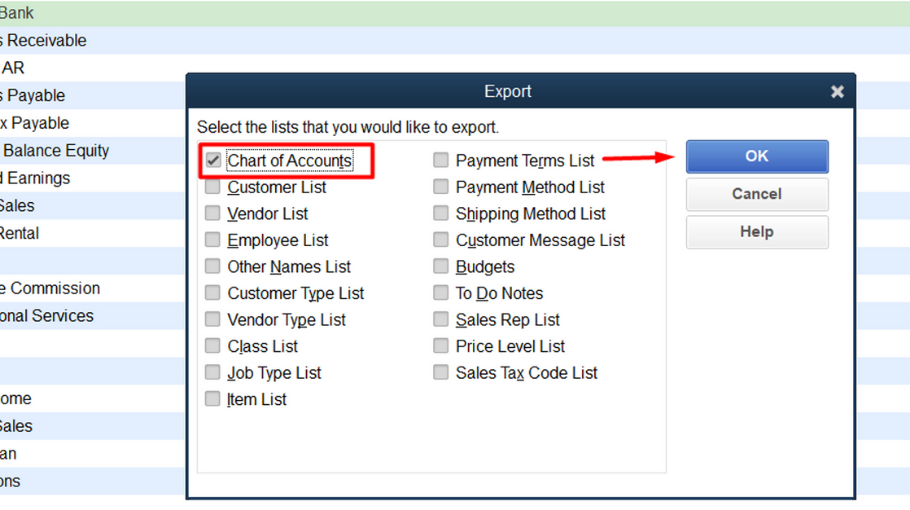
Step 6: A pop-up window containing a checkbox list will get displayed.
Step 7: From the list, choose “Chart of Accounts”.
Step 8: click on“Save as”. From the “Save as” drop-down which is located at the top select folder where you want to save this file.
Step 9: Enter the File Name. However, the file name you enter should be descriptive (example: ABC Construction).
Step 10: Click “Save”.This will result your Chart of Accounts to be exported.
These ten steps will help you export the chart of accounts with both online and desktop version of the QuickBooks Accounting software. Now read the next paragraph that will help you export the chart of accounts from the online version of QuickBooks software.
Method to Export Charts of Accounts from QuickBooks Online Version
Step 1: Open the QuickBooks company file.
Step 2: Select the Chart of Accounts you want to export.
Step 3: Go to “Accounting” option, select “Chart of Accounts” and then click on “Run Report”.
Step 4: The online version of your Chart of Accounts will appear. Click on the “Export” and then “Export to Excel”.
Step 5: Next, Save as a dialog box will appear. Browse the location where you want to save this file.
Step 6: Enter a descriptive “File Name” and at last hit “Save” to complete the process.
These steps will help you export charts of accounts from QuickBooks Online version, and the next paragraph will cover the converting exported file to Microsoft Excel.
Steps to Convert Exported File to Microsoft Excel
In order to import the exported file back to QuickBooks, it is required to be converted into Excel format. Here is how you can do it:
Step 1: Go to Microsoft Excel.
Step 2: Select “Text Import Wizard” and open the IIF file you want to convert. Microsoft Office 2007 users can find the given option in the Data tab under the name “From Text”.
Step 3: The Import Text File dialog box will appear from it select “All Files”. Locate the IIF file and click “Open” to access it.
Step 4: Next, choose file typeà Delimited à Next. After this, select “Tab” from the checklist and hit the “Next” button.
Step 5: Now, you’ll be asked to select the column data format. Click on General and then Finish. A small pop up appears asking you where to put data. For this, select “Existing worksheet” à “Okay”.
Step 6: Go to File menu, select “Save as” to save files in excel. As you save the file .xls extension will be added to your file name.
Following these steps will help you to convert Exported File to Microsoft Excel. Now you can open and use your newly saved Excel file.
Conclusion
So, this was all about different processes involved in the export of charts of accounts in QuickBooks. If you encounter any issues during the process, simply reach out to the QuickBooks customer care team.
This blog will help you understand the export chart of accounts in QuickBooks and also the different steps that will help you understand the whole thing better so please read the whole blog carefully. Hopefully, this blog will help you save some time and adds some new information to your information bank.